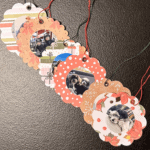
DIY Photo Ornament
Make these simple DIY photo ornaments to display on your tree, garland, or to gift!
Servings: 16
Cost: 10
Equipment
- 1 Pair of scissors
- 1 Cricut or other cutting machine optional can use scissors
- 1 Crop-a-dile or hole punch
Ingredients
- 4 pieces Patterned Paper coordinating colors (can use more if wanted)
- 1 piece Letter size Matte Photo Paper
- Tape or Glue Elmer's Tape Runner works great
- String
- 2 Eyelets
Instructions
- Use a Cricut to cut the patterned paper into scalloped circles approximately 3.5 inches round. Cut 2x the amount of ornaments. So if you want 16 finished ornaments, cut 32 circles.
- Print out photos sized at 2 inch rounds. I fit 16 round photos on one 8.5x11 inch paper.
- Use tape or glue to attach the 2 inch photos to the 3.5 inch scalloped circles.
- Use a crop-a-dile to punch a hole and set an eyelet into the top of 16 of the scalloped circles.
- Add a string through the eyelet at the top. Tie to create a hanger for the ornament.
- Use tape or glue to attach another piece of patterned paper to the back of the ornaments.